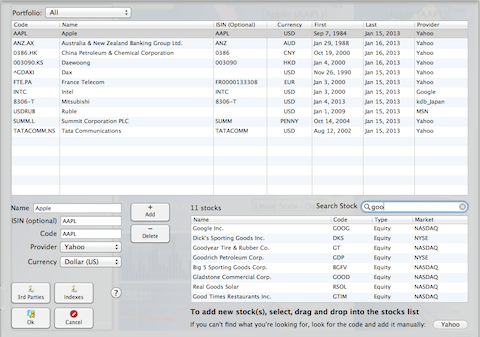
The panel to manage stocks can be accessed through the Edit Data Panel or through the main menu “Tools”, ”Manage Stocks” or using the keyboard shortcut “A”

- Note, by default the portfolio (top) is set to “All”, but you can change it, enabling you to create new stocks in the portfolio of your choice.
After adding a stock, the application automatically load all available historical data and automatically generate splits, providing they are standard values.
The stock code must be recognized by the selected internet provider. If it’s not, the program will display an alert. You can decide not to update through Internet, and import data from a file, by selecting “Manual”.
The easiest way, to add a stock, is to use the Search text field. Enter the text to search and, if ok, select one or several stocks from the list of suggestions, drag and drop into the main list of stocks. As you type, the program proposes a short list of suggestions (not all possibilities), the more letters you type the more the list is refined.
Why not present all possibilities at once? This would produce a long list for the user to scroll and seems to be less practical than refining the search with additional letters.
The ISIN code is used for multi stocks update from a file. The ISIN code is supposed to be/become an international identifier standard... but we’re certainly not there yet. See help on “Update Data” to understand how to use this field.
To remove a stock, select it in the list and, either press the keyboard delete key or press the button “Delete”. A confirmation panel will pop up and the stock will be removed if you confirm. Note , when deleting a stock, all related data are also deleted, like Lines, Fibos, Comments and Investments.
You can also add all stocks from an index at once, using the Index Panel. Press the button Index.
Finally, you can add stocks using third parties providers by pressing the “Third Parties” button.
